Recently I have been testing out Microsoft Copilot Studio. My aim while testing was to be able to build a bot that would answer questions about Power Platform and some of the development standards I have written and held on my SharePoint site. Having the bot connect to external websites was exceptionally simple but having the bot search SharePoint was proving to be difficult.
After much research and head scratching I found out that for a Copilot to connect to a SharePoint site or even Onedrive you need to configure authentication for the bot. Using Microsoft Entra ID the process of doing this can be confusing so here is a step by step guide on how to create your bot, attach it to your SharePoint Site and set up authentication through Microsoft Entra ID.
Step 1. Create Your Bot
From the Copilot Studio copilots page select the new Copilot Button

This will then take you to a Copilot led Copilot creator
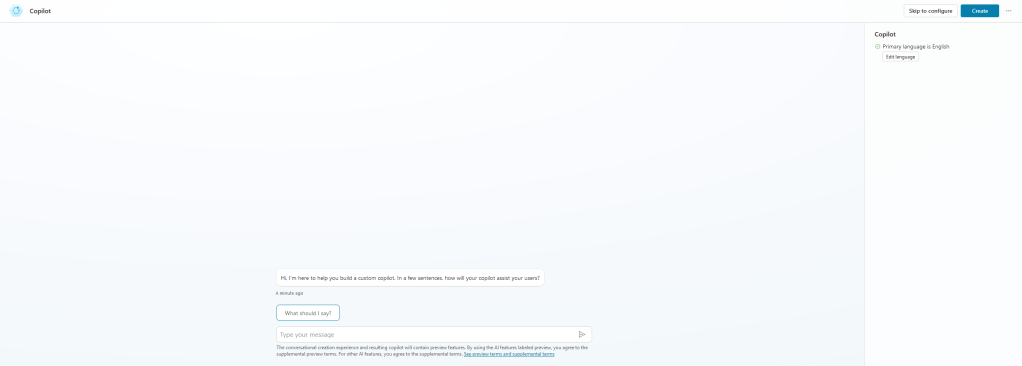
For the purposes of the guide I am going to press the ‘Skip to configure’ button in the top right which will take me to the following screen.

Here I will give my Copilot a name and description. At the moment instructions are not necessary. As for the knowledge sources we can add our SharePoint or OneDrive link here but as authentication isn’t yet configured these links won’t be able to be used for generative answers at the point of the Copilot being created. With the name and description added we can now press create.
Step 2. Setting the security settings of your copilot
Once the Copilot is created we then have to access the security settings. In the copilot creation window select the “settings” button in the top right and the the Security menu option. You should then see the following options
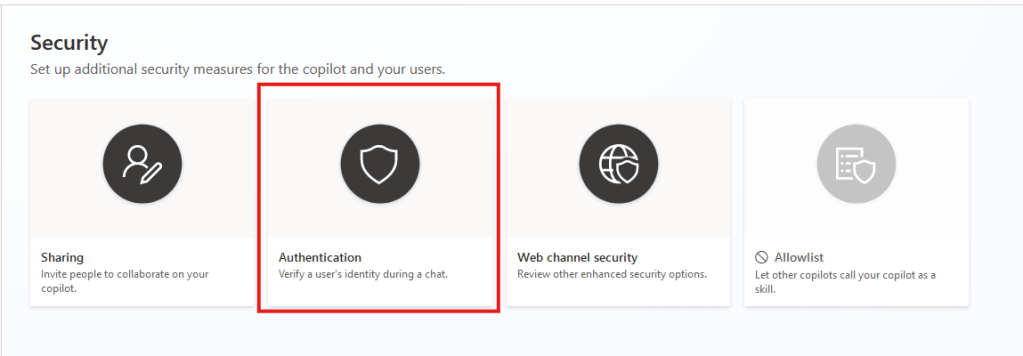
We want to select the Authentication option from there the following menu should appear on the right hand side.

We need to select the “Authenticate Manually” option and tick the “Require users to sign in” box. We use “Authenticate Manually” because SharePoint requires granular permissions and specific copes that need to be explicity defined. In Copilot studio the “Authenticate with Microsoft” option doesn’t offer this level of control. As you can see from the above screenshot we need to provide the bot with a Client ID, Client secret and a set of scopes. For this we need to set up an app registration in Microsoft Entra ID.
Step 3. Create your app registration
First we need to navigate to Microsoft Entra ID. From here we need to select the applications section and then select “App registrations”. You should see the below

We need to select “New Registration” which should bring us to the following screen

We’ll need to give the app registration an identifiable name and select the “Accounts in any organizational directory (Any Microsoft Entra ID tenant – Multitenant) and personal Microsoft accounts (e.g. Skype, Xbox)”. Selecting this option will enable users who are not on your tenant to use the Copilot and authenticate while using it. Once you have hit register you will land on the “Overview” page of your regisration from here you can get one of the pieces of required information. Look for the text “Application (client) ID” the value to the right of this needs to go into the “Client ID” field of your Copilot.
It is worth noting that this authentication does not give them access to the internal sharepoint knowledge sources. So your organisational data remains safe.
Step 4. Add the bot redirect URL to the app registration
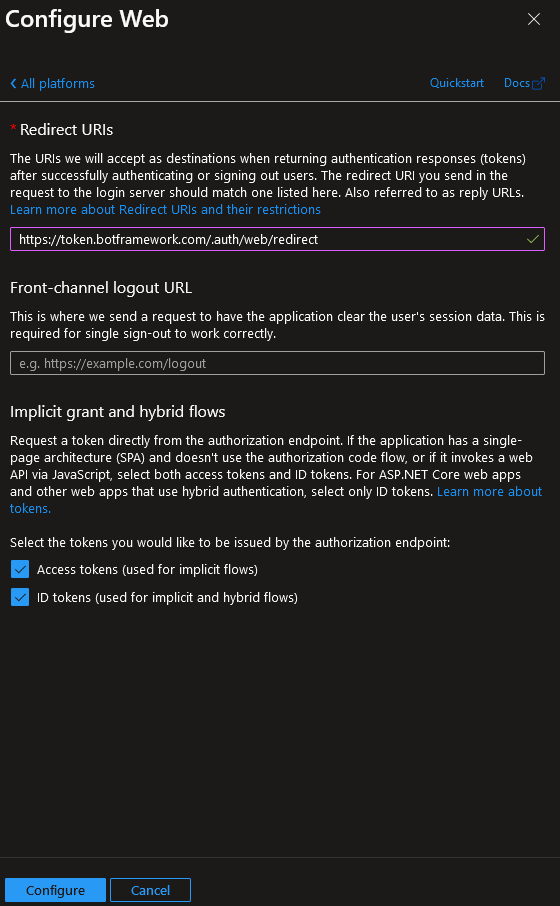
This step is relatively simple. When we selected the “Authenticate manually” option in the bot settings the first field given was a redirect URL. You will need to copy this and then in your app registration select the “Authentication” menu option and then the “Add a platform” button.

After this we select the “Web” option and in the “Redirect URIs” input paste in the redirect URL we copied from the Copilot chatbot settings and select both of the checkboxes uner “implicit grant and hybrid flows”. Your setup should look like the below.
Step 5. Get the Client Secret
The next step is getting the other piece of information our Copilot asked for. This is again done in the app registration. Go to the “Certifcates & secrets” menu within your app registration and select “New client secret”. Give the secret a meaningful description and selct an expiry timeframe.
Be aware this expiry timeframe should be as close to the lifetime of your bot as possible. If the secret runs out prior to your copilot being decomissioned this would make the chatbot inoperable.
Once you select add, copy the secret value and store it somewhere secure because once you navigate away from this page the value will be obscured. If you haven’t saved it you’ll have to generate a new client secret. This value is the value that needs to be pasted into the “Client secret” field of your Copilot.
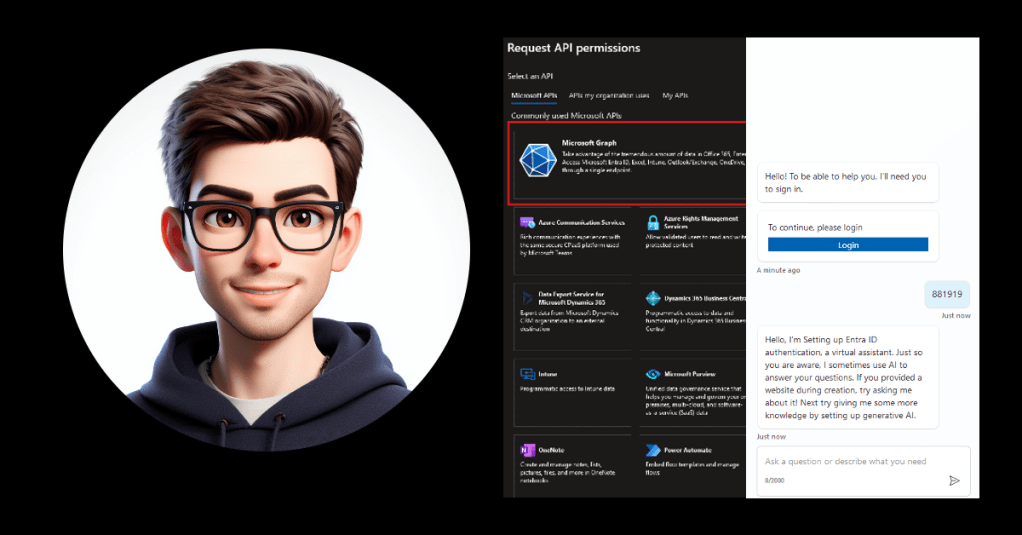
Step 6. Configure API permissions
For users to authenticate and use SharePoint knowledge sources that they have access to you’ll need to grant some API permissions to the app registration. Right now we’re staying in the app registration area. Select the “API permissions” menu option and then select the “Add a permission” button. You should see the following menu on the right hand side.
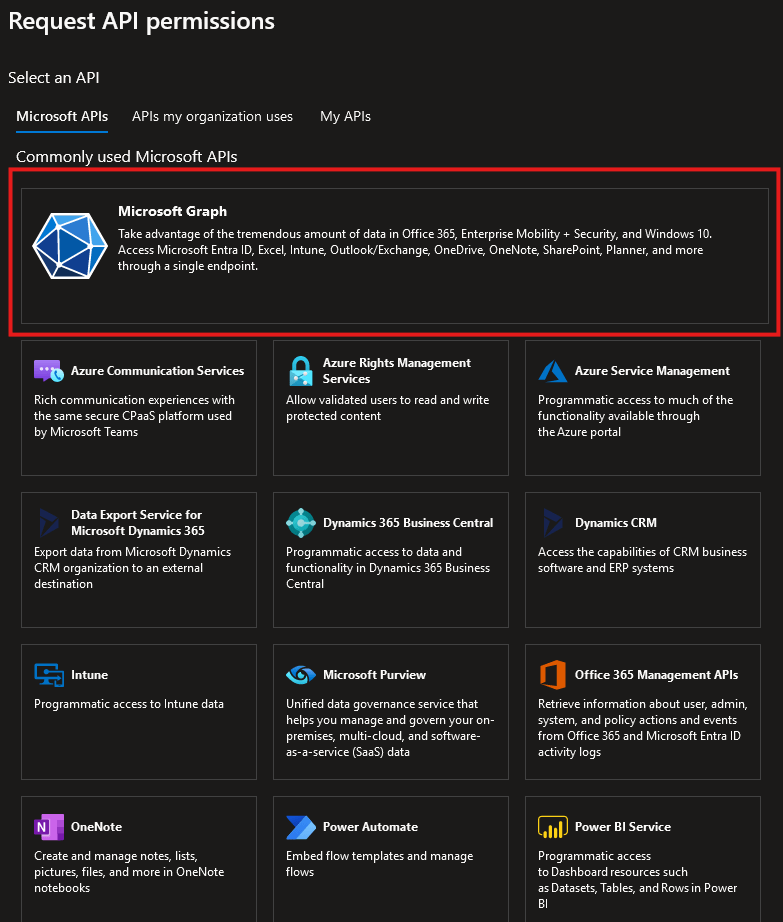
Select the “Microsoft Graph” option and then select “Delegated permissions” you should then see a list of permissions options like below

We need to add four of these to enable our chatbot to use SharePoint and OneDrive as knowledge sources, these are:
- openid
- profile
- Sites.Read.All
- Files.Read.All
By giving the app registration these permissions we are giving the Copilot the ability to read the sites and files within connected knowledge sources that are contained within the tenant. After these are selected we can press “Add permissions”. Once these are added you will need to press the “Grant admin consent for <tenant name>” button. If you do not see this yo will need to ask an admin with the right privileges to do this on your behalf.
Step 7. Update the scopes in your chatbot
The hard bit is now done. With the app registration all set up we can return to our Copilot. At this point the Client ID and Client Secret should both be filled and all we have to do is update the “Scopes” section with the names of the API permissions we have just added. Before you hit save on your authentication permissions it should look close to this.

Step 8. Publish the copilot
Once we have saved the authentication settings the copilot needs to be published for them to take effect. After that’s done your Copilot will ask you to login when chatting.
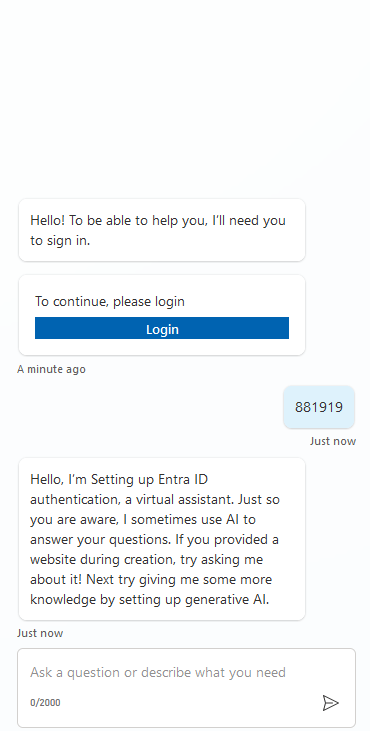
Congratulations – you have now set up Microsoft Entra ID authentication for your chatbot and can add your SharePoint knowledge sources with surety that they will be used and users will see generative answers only from documentation they have access to.


Leave a comment